Manual
Login
Our 3D CAD supplier models have been moved to 3Dfindit.com, the new visual search engine for 3D CAD, CAE & BIM models.
You can log in there with your existing account of this site.
The content remains free of charge.

Top Links
Manual
 |
Ein weiteres Beispiel wie man den Import-Pfad setzen kann, wenn Produkte verfügbar sind:
-
Erstellen Sie einen VBS filter node (irgendwo in der Pipeline nachdem der Konverter gelaufen ist). Setzen Sie VBS file (
plugin_template_DTO.vbs) und VB Class (PluginBaseC_DTO). -
Fügen Sie folgenden Code bei der Funktion
DTOein:' Create new classification Dim classification As PSolUnitProxy.prxClassification_1 Set classification = CreateObject("wh.Classification_1") classification.SystemId = "customID" ' Prepare attribute. Dim newAttr As PSolUnitProxy.prxProductAttribute_1 Set newAttr = CreateObject("wh.ProductAttribute_1") ' Prepare the attribute value. Dim newAttrVal As PSolUnitProxy.prxAttributeValue_1 Set newAttrVal = CreateObject("wh.AttributeValue_1") newAttrVal.Text = "newtestpath/whatever“ ‘ Import Path for parts newAttr.Name = "imppath_" newAttr.Group = "imppath" Set newAttr.Value = newAttrVal ' Add Attribute to classification classification.addAttributeValue(newAttr) ' Add classification to product product.addClassification(classification) -
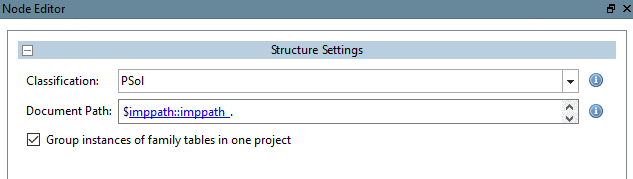
Bearbeiten Sie den Structure Node in PARTdataCenter.
Document Path: imppath (Group of attribute); imppath_ (Name)